ORACLE EM Cloud Control 12c (64bit) on Solaris (64bit)
Now that we
have Solaris ready and ORACLE database on it up and running, we will go further
and install brand new Oracle EM Cloud Control 12c in order to monitor the test
environment. Base OS should be Solaris
64bit, with 60Gb hard disc and 8GB RAM, 9GB swap space. Also, in the test
environment, you should have one DNS server. If you experience the problems with SWAP
space, use the guide I have made in the blog before.
I assume that you have ORACLE 11gR2 database
64bit (11.2.0.1.0) up and running on the Solaris server on which we will
install EM Cloud Control 12c. You can use the guide I’ve made before on this
blog.
Now, we are
doing installation of brand new Enterprise Manager on the server which already
have one from the database installation so we can say good-bye to it:
Login to
the server as oracle user and issue the following command:
$
emca -deconfig dbcontrol db -repos drop
You must
provide ORACLE SID of the already installed database, listening port and passwords for the SYS users. This process takes
about a minute.
Next, you
must do some changes in the existing database which aims SPFILE’s variables:
peocesses, session_cached_cursors and job_queue_processes. But, that’s not all the changes you need to do, you’ll
need to do some more after installation… In order to change the value for those
3 variables we will use SQLPLUS so issue the followind again as oracle user:
$
sqlplus “/as sysdba”
SQL*Plus: Release 11.2.0.1.0
Production on Mon Sep 23 07:41:17 2013
Copyright (c) 1982, 2009,
Oracle. All rights reserved.
Connected to:
Oracle Database 11g Enterprise
Edition Release 11.2.0.1.0 - 64bit Production
With the Partitioning, OLAP, Data
Mining and Real Application Testing options
SQL>
Issue the
following:
SQL> ALTER SYSTEM SET processes=300
SCOPE=SPFILE;
SQL> ALTER SYSTEM SET
session_cached_cursors=200 SCOPE=SPFILE;
SQL> ALTER SYSTEM SET
job_queue_processes=20 SCOPE=SPFILE;
In order to
changes we’ve made affect the database we must restart the database:
SQL> SHUTDOWN IMMEDIATE;
and
SQL> STARTUP;
Hopefully,
if everything by now went OK, then you are free to start the installation of EM
Cloud Control 12c.
Extract all
3 archives to one folder and copy it to the /export/oracle/home/
Now,
usually you will start with ./runInstaller in order to begin with the
installation. Here a had an “cannot execute” issue. After a while I figure it
out that I have problem with the permissions with the installation files.
Solution was that every file and folder in the installation folder got 755
permission code. That did the trick for me.
Now you can
issue the “./runInstaller” command and wait for the initial screen:
Since this
guide is just for test purpose, unchecks the security updates ckeckbox end
click “Next”. Program will warn you that you did not write the email address
but that’s ok, just click “Yes”.
Again, we are doing some testing so choose the “Skip” radio buton and click “Next”
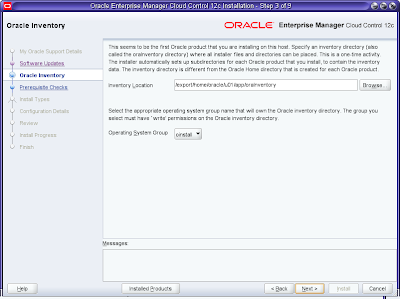
Check that
the Operating System Group is “oinstall” and that inventory location is like on
the picture.
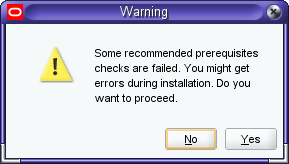
Now,
prerequisite check, ignore the warning that I got, it have something with the
server name and the domain.
Click “Yes”
Here,
choose the “Create a new EMS”, “Advanced” and make a new directory with the
name “middleware” and make sure that the full path to it lies on the “Middleware
Home Location” box.
First four
plugins are default and it should be installed. Mark the Oracle Fusion
Applications and Exalogic Elastic Cloud Infrastructure and click “Next”.
Make a new
Weblogic and NodeManager passwords and click “Next”.
Provide IP
or full DNS name of the server where database is running, port, SID and SYS
password and click “Next”.
Click “Yes”,
installer will disable the mentioned job.
Also,
installer will check the database configuration and display some recommendations.
You can do it later so click “Ok”.
Make a new
sysman and registration passwords and click “Next”.
You should write down or take a screenshot of this picture and click “Next”.
Also,
review the installation and click ”Install”. That’s it. At the installation
finish, you’ll have to run script as root user and everything is done.
One more
thing about this installation, Oracle database NLS or regional setting MUST be
the same as Solaris regional settings. Otherwise you’ll get the error during installation
with the message “Locale not found” as I got first time.
Next, in
order to control the EMCC after the installation, you need to update your “.profile”
file for the “oracle” user. File is
located in /export/home/oracle/ folder and needs to be changed (here is mine
from the previous ORACLE database installation and the corrections which were made in red):
# Oracle Settings
TMP=/tmp; export TMP
TMPDIR=$TMP; export TMPDIR
# Select the appropriate ORACLE_BASE
ORACLE_HOSTNAME=solarisgrid; export ORACLE_HOSTNAME
ORACLE_UNQNAME=oragrid; export ORACLE_UNQNAME
ORACLE_BASE=/export/home/oracle/u01/app/oracle;
export ORACLE_BASE
ORACLE_HOME=$ORACLE_BASE/product/11.2.0.2/db_1;
export ORACLE_HOME
ORACLE_SID=oragrid; export ORACLE_SID
OMS_HOME=$ORACLE_BASE/middleware/oms;
export OMS_HOME
AGENT_HOME=$ORACLE_BASE/middleware/agent/core/12.1.0.1.0;
export AGENT_HOME
PATH=$ORACLE_HOME/bin:$PATH; export PATH
That’s it,
weblogic admin console is located at address: https://192.168.56.101:7101/console,
username weblogic.


Ingen kommentarer:
Legg inn en kommentar